Category filtering is a powerful feature that allows your visitors to organize and filter map markers in real-time. Whether you are building a store locator, a restaurant guide, or a directory of landmarks, categories help users find exactly what they are looking for quickly.
Note: Category Filtering is a Premium feature. Make sure you have the Pro version installed and activated.
Step 1: Create Your Categories #
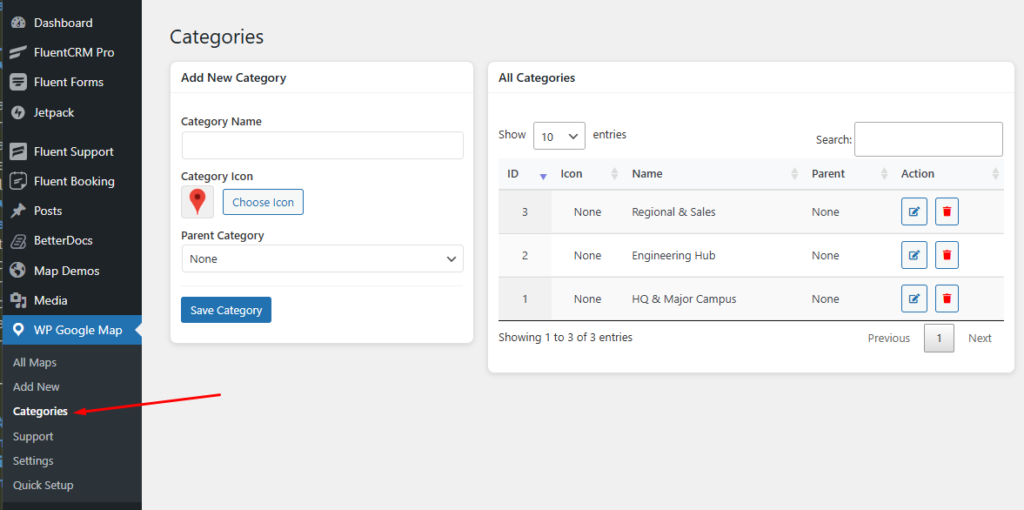
Before you can filter markers, you need to define the categories they belong to.
- Navigate to WP Google Map > Categories from your WordPress dashboard.
- In the Add New Category form, enter a Category Name (e.g., Restaurants, Hotels, Gas Stations).
- Choose a Category Icon by clicking Choose Icon.
- This icon represents the category in the filter panel.
- You can upload your own or choose from the library.
- (Optional) Select a Parent Category if you want to create a hierarchical structure (e.g., Fast Food under Restaurants).
- Click Save Category.
You will see your categories listed in the table on the right side of the page.
Step 2: Assign Markers to Categories #

Once your categories are created, you can assign them to your marker pins.
- Go to WP Google Map and click Edit on the map you want to manage.
- Switch to the Markers tab.
- Click the Edit icon on an existing marker, or click New Marker to create a new one.
- Find the Category multi-select dropdown.
- You can assign a single marker to multiple categories.
- Simply click the categories you wish to include.
- Click Save Marker.
- Important: After saving individual markers, remember to click the Update Map button at the bottom of the map editor to save all changes.
Step 3: Enable the Filter on the Frontend #
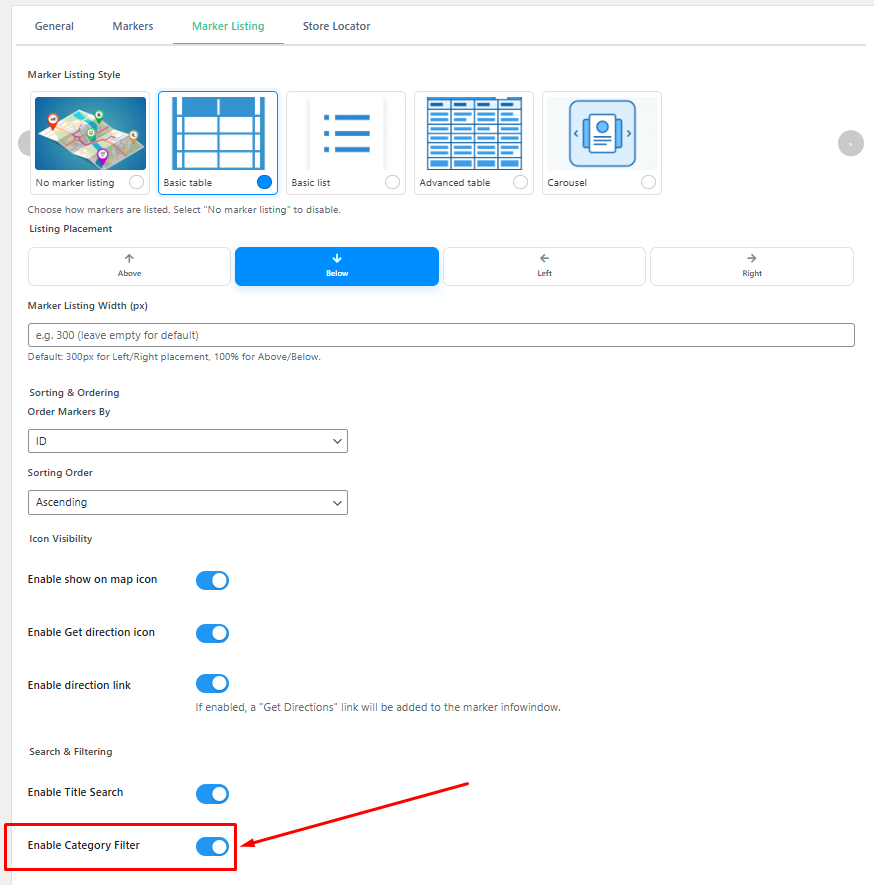
By default, the category filter is hidden. You must enable it for each map where you want it to appear.
- In the Map Editor, navigate to the Marker Listing tab.
- Scroll down to the Search & Filtering section.
- Find the Enable Category Filter option and toggle the switch to On.
- Click the Update Map button at the bottom of the page.
Step 4: How it Works on Your Site #

When a visitor views your map, they will now see the following:
- Filter Panel Access: A toggle icon appears (typically near the search bar or inside the map).
- Checkbox Selection: Users can select one or multiple categories to filter.
- Instant Result: The map instantly hides markers that do not match the selection.
- Hierarchy Support: If parent categories were used, users can expand/collapse sub-categories.
If you need please see demo here
Troubleshooting Tips #
- Categories not appearing? Ensure you have assigned at least one marker to the category and that “Enable Category Filter” is toggled on in the map settings.
- Caching Issues? If you add categories but they don’t appear on the frontend, clear your site’s cache (WP Rocket, LightSpeed, etc.).
- License Check: If the settings are locked, verify that your Pro License is active under the “Settings” page.


